
First time gardeners face a list of choices that can be somewhat daunting at first. Where to begin? What do I plant? What tools do I need? (and on and on…) But if taken a step at a time and prioritized correctly, the process can be streamlined quite a bit.
I’d like to give a few pointers here on some general priorities for people who are looking for direction.
Do’s and Don’ts
Location is one of the first concerns. Make sure it is a sunny space that receives at least six hours of sunlight per day, or more, without any major obstructions. The placement should be as close as possible to your house or kitchen to make it more likely to use the space for growing and make it easier to move produce from the garden to the house. But don’t locate it close to the house at the cost of sun exposure. Think about how close it is to your water source as well. The closer to a main water spigot, the less walking and hose lengths for you over the season.
Drainage is something to look at as you decide the site location. Gardening is harder on a hillside or on undulating ground, although it can work. You should preferably choose a flat site with good drainage around it, where it won’t get too waterlogged or too dry.
Plan for later expansion.
You don’t want to paint yourself into a corner by limiting where your garden could expand later on if things went well. Try to visualize from the starting shape of your garden location, which direction it might expand in coming years if the gardening thing works out. It will make everything far easier to adjust later on if you simply add on to your existing garden in its original location. The exception here, of course, is if you only have limited space and don’t have the luxury of expansion. Then the garden will simply reside where it can. If you’re planting in a container garden or planting boxes, that will make the garden space far more modular and portable, but will be a different animal than a traditionally planted garden space described here.
Size of the garden is dependent on a few things. Your time commitment is the first priority. Most gardeners are directed to start small, and I would tend to agree, but there are certain situations where starting a little bigger is also recommended. Lets say you have a situation where you are going to surround the garden plot with a fence and some permanent landscaping. If you start small you may fence in a shape that ends up being too small for your needs in a couple years. In a case like this, you might think about where the permanent border would go, start with that, but only cultivate the number of beds in that area that you have time for, while leaving the other untended beds sheet mulched and improve the soil until you can add them to your schedule. You will also want to keep in mind that it’s nice to have some spare space around the garden to use for compost piles, worm bins, storage, or maybe a chicken coop down the road. Design in a bit of extra space around the plot for the inevitable need for a spare place to put things.
Slightly raised beds with no structural borders work fine.
Bed Shape is up to the gardener. Whimsical shapes designs can be interesting, but if you ask most long-time gardeners, the standard rectangular beds work best for the actual practice of gardening over time. A standard rectangle four to five feet wide by ten or twenty feet long is a good bed shape to create. The 4 foot width allows cultivation and weeding from both sides, and the length can vary, but 10 or 20-foot length on each bed is a common scale. It makes for easier irrigation, and can be transformed with a hoop house for season extension down the road at that size.
Raised Bed Garden? I recommend raised beds for a number of reasons.
- They warm up (and dry out) earlier in the season so you can work the soil and get seedlings in.
- They aid in accelerating plant growth since they have deeper soil with less compaction
- Creating good soil in a raised bed can be more easily done than trying to improve bad soil under your lawn.
- They improve drainage overall on the garden beds.
- Reduces the problem of invasive roots from neighboring trees and shrubs
- Adapts easily to cold frames and hoop houses
- Keeps dogs and other pets out of the beds since they take extra jump to get up into.
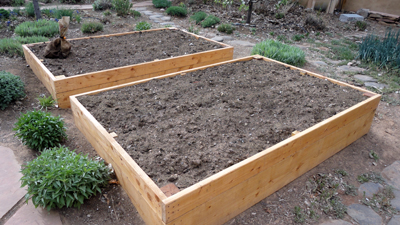
Raised beds of wooden construction.
Now, that being said, this doesn’t mean you have to go out and buy a whole bunch of lumber to build wooden boxes for your raised beds. That route is fine and works quite well, but you can also create the borders on a raised bed with bricks, logs, and other found items you might have around. And you can create raised beds without any boarders by simply double digging your beds and adding composted organic matter to the soil during the process that raises the bed a good five to eight inches. If you do choose to build your own wooden boxes for raised beds, be sure to check out our unit on raised bed construction to avoid some of the common mistakes.
Fencing is a common step that is missed by beginning gardeners until they come out to their plots on a July morning and discover that the deer have feasted on all their precious crops. Depending on your situation, you might be installing waist-high garden wire fence to keep a few dogs out, or if you’re in deer country like I am, you may have to install a larger barrier.
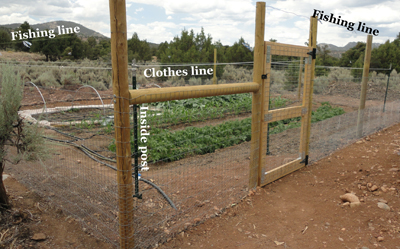
Psychological deer fence. Four-foot fence below, and nothing but string above. Clothes line on inside landing zone. Eliminates need for an eight-foot fence.
One quick note on deer fencing. It doesn’t have to be too formidable. I have used what I call a “psychological deer fence” with great success in my garden. The main fence is a four-foot mesh fence strung between 8 foot posts, and I simply add a line of heavy gauge fishing wire at eye level and again at the top line of all the posts. The fishing line has a few strips of flagging at the mid point between each post so the string can be detected at night. This in itself won’t keep out a curious deer, but the next step will. Inside the perimeter of the fenced in garden you place four drive-in metal six-foot fence posts available at most lumber yards. You simply place one of them in each corner about two feet inside the perimeter of the original fence. You then string a piece of white clothesline at the four-foot level of the posts and it creates a floating rope square that the deer see inside the jump zone. This landing area is critical for the deer, and since that rope hangs in the way, they simply won’t jump the fence.
Diagram your ideas on paper and get a feel for what it might look like. Once you have decided on location and general size of the garden plot and the number and size of the beds inside that plot, a fun way to make it more real at first is by using Google Maps. Just go to Google, choose maps, and enter your address. Make sure the satellite view is checked in the upper right. Now zoom into your house and yard until you get too close and the resolution drops. Back up one step and save your screen. (Screen shot)
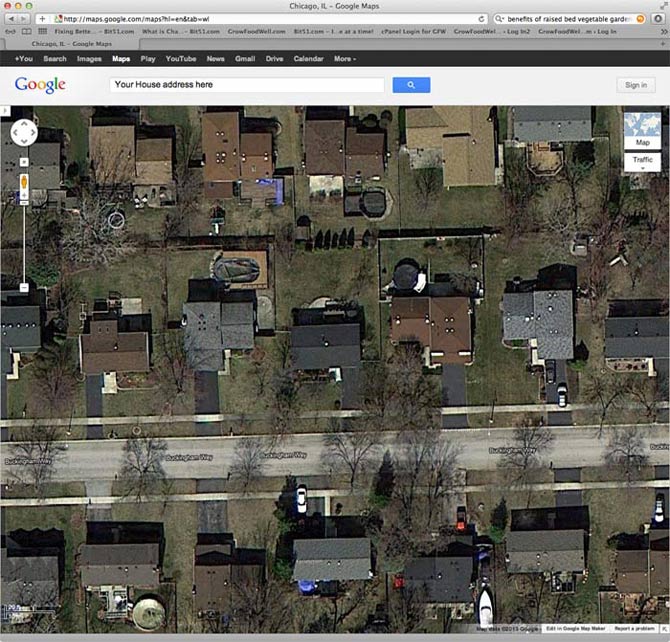
How to take a screen shot:
For Mac:

Then find that screenshot on your desktop and open it in an image-editing program. You can add the garden bed shapes to your photograph there, or print out the photo on paper and draw them in by hand. Keep it on file to visualize how you started.
For Windows:

Then open any image-editing software and open new image and paste your screenshot from the clipboard. You can add the garden bed shapes to the image in that software, or print out the image on paper and draw them in by hand.
So it might look something like this:
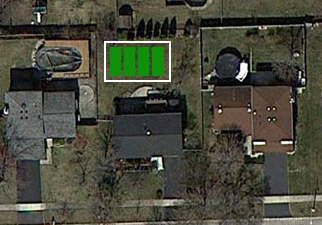
So now you see a person who is planning on four beds, with the long edge running roughly north to south, with a fence line around it. Notice there is also ample space on the right for later compost piles, worm bins or maybe a chicken coop. Either way, it leaves options for the gardener to utilize the space available, while leaving some extra space around the garden for other components. Make sure you don’t put compost at least 20 feet from the beds. You want enough separation so that critters that hide there won’t sneak into the beds.
OK, so now you should have step one accomplished. If you haven’t yet, then turn off the computer, go outside and sit in your yard for a while so you can visualize your new garden and lets get started.
Tom.
I really like you ideas on the deer fence. I will definitely employ that at my garden.
Question: you say “The main fence is a four-foot mesh fence strung between 8 foot posts”. Are the posts 8′ from ground level? I haven’t found those posts longer then 8′. Assuming a minimum of 18″ buried depth that leaves only 6.5′ of post hight. Is that right? Otherwise I have to find 9.5′ – 10′ posts.
Thanks
M@
It really does work. We have deer surrounding us most of the year, they walk the perimeter eying my cover crops in the off season and everything else during main season, but have never once tried to jump in.
My posts are 8′ to start, and I bury them a foot and a half and tightly pack them in with rocks, gravel, and our native clay soil. That leaves about 6.5 feet above ground, some a bit more since the holes deviate in depth due to running into boulders etc… and it works fine. Whether the above-ground height is six feet or eight feet doesn’t seem to matter. it’s all about the clothesline on the inside. The deer are very protective of their legs, and landing zones are key. I replaced the fishing line last year with braided aluminum wire as a permanent answer, since the fishing line eventually fell prey to solar damage. I don’t use the flagging anymore either, but it still works, since they can see the thick wire and know it is a barrier. Good Luck! Hey, send me some pictures or your status report this season. I’m starting up our annual garden class in a few weeks and I love to report how things work for other people. Thanks, Tom
Hi Tom,
Love your website and your videos!
Would you be willing to share plans or how you built your worm bin from a freezer?
Thank you!
Kris Dahl
Bogus Jim Gardens and Guesthouse, LLC
Hey Kris!
Great question, and congratulations on entering the wonderful world of vermicomposting!
There are so many different configurations of freezers etc… that there’s really no single way to explain it,
But basically, what you will need to do is:
1) if motor and freon tank still in fridge or freezer, you need to crimp freon line and remove both. (local recyclers will take the freon tanks.)
2) With a sawz-all or similar, need to cut out bottom of freezer (as it stands however you are configuring it. If it is a top access chest freezer, then it is the bottom you cut out. If it is a vertical stand-up freezer then you will lay it on it’s back and then that is the bottom. Anyway you will cut the bottom out, but very important to leave a perimeter of a few inches inside that space to support a heavy gauge screen that will act as your new bottom that lets all the good oxygen in. I usually find some scrap welded wire mesh that is thick and strong at the recycling yard where you pick up the freezer. If you are simply converting one of your own old freezers, you will still need to find a stout wire mesh to use as the ‘floor’ in the unit to support the carbon material that will be layered in the bin, and it allows oxygen to flow into the bin. The entire bin should optimally be sitting on some sort of supports about 10” off the ground. I just use some old 4×4” posts that it sits on to give it about 10” of airspace below the bin to accommodate airflow from below.
3) I like cutting some ventilation into the upper side of unit as well to provide more oxygen on top area of bin. Or you can insert the PVC pipes like I showed in the worm bin video that bring passive oxygen up from bottom screen.
Once you setup the bin and start adding the first carbon materials, here are a few guidelines for keeping worms happy:
-Try not to create a traditional compost mix of materials. This will tend to get too hot and cook the worms. The worm bin will
have a majority of wet carbon materials, leaves, shredded cardboard, etc
-then you add nitrogen or plant based materials to that base and the worms will find it and feed.
-they will also feed on the carbon materials as well
-ALL carbon materials should be wet when placed in the bin. They should have the consistency of a wrung-out sponge.
-You don’t want the bin to ever get too wet and go Anaerobic. In this setting, there is not enough oxygen for the worms and they
will try to escape out the top rim of container to try to get more air.
Worms will migrate to spaces between wet layers of carbon material. this is one of their favorite spots to hang out.
-There is a balance to the worm bin. each week you will know by smell and texture what is going on in there. So simply check on them, make
observations, dig down and see where they are locating and what they are feeding on.
-Do not locate the bin in direct sunlight unless it has a large insulated cover on it and insulated sides. If it overheats by being in the sun,
the worms will not make it.
-Best to have worm bins placed in permanent shade, or if there is no shade, then a shade roof can be built over it to protect it.
-Worm bin should always have a physical top covering it to avoid too much evaporation.
-To enhance airflow and avoid anaerobic conditions, best practice is to install (2) 4” diameter plastic pipes that you stand vertically in the
bin, supported by material packed in around them. This will bring air from the bottom screen, up into the air above the pile in the bin.
These two pipes are a backup for ensuring airflow as the bin fills over time. Eventually you will have a large supply of materials in the bin
that can get matted down as they naturally compress, This material can impede airflow, but since the pipes are there, the air can still keep the
bin ventilated and the worms happy.
Hope that helps…
If there are specific points where you don’t understand the process, just give me some specific questions and I’ll see if I can answer them for you.
Cheers
Tom Bartels
GrowFoodWell.com